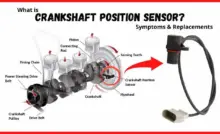
The crankshaft position sensor is a vital component of your vehicle’s engine management system. It detects the crankshaft’s position and sends this data to the engine control unit (ECU). This information allows the ECU to optimize ignition timing and fuel injection, ensuring smooth and efficient engine performance.
Over time, the crankshaft position sensor can fail or degrade, causing noticeable engine performance issues. If you encounter any of the following symptoms, it may be time to replace your crankshaft sensor:
This guide provides a detailed step-by-step process for replacing the crankshaft position sensor, including updated tools and techniques.
A crankshaft position sensor should be replaced when it fails or shows signs of wear. As a preventive measure, many mechanics recommend replacing it every 50,000 to 100,000 miles. Always consult your vehicle’s owner’s manual or a qualified mechanic for specific guidance.
The cost of replacing a crankshaft position sensor varies based on the make and model of your vehicle, your location, and whether you perform the replacement yourself or hire a mechanic.
DIY replacement can significantly reduce costs.
To replace a crankshaft position sensor effectively, gather the following tools and materials:
Before starting, ensure you are working in a well-ventilated and safe area.
To avoid electrical hazards, disconnect the negative battery terminal.
Use a floor jack to lift the vehicle and secure it with jack stands. Double-check stability before proceeding.
Consult your vehicle’s manual to find the sensor. It is typically located near the crankshaft pulley or at the engine block’s front or rear.
Carefully unplug the electrical connector from the sensor. Avoid pulling on the wires directly.
Using a ratchet and the appropriate socket, remove the bolt securing the sensor. Some vehicles may require additional component removal for better access.
Gently wiggle and pull the sensor out of its mounting hole. If it resists, ensure the bolt is fully removed.
Verify the new sensor matches the old one in size, shape, and connector type.
Lubricate the new O-ring with a small amount of oil or silicone grease. This helps with installation and creates a proper seal.
Align the sensor with the mounting hole and gently push it into place. Secure it with the bolt, tightening it to the manufacturer’s recommended torque.
Plug the electrical connector back into the new sensor, ensuring a secure fit.
Using the floor jack, lower the vehicle back to the ground and remove the jack stands.
Reconnect the negative battery terminal.
Use an OBD-II scanner to clear any fault codes stored in the ECU. This step ensures the “Check Engine” light is reset.
Modern vehicles often require a relearning process for the ECU to adapt to the new sensor. This can be done by driving the vehicle under various conditions or using a diagnostic tool.
Replacing a crankshaft position sensor is a straightforward process when approached methodically and with the right tools. By following this updated guide, you can restore your vehicle’s performance and avoid costly repairs.
If you’re unsure about any step, consult a professional mechanic to ensure the replacement is performed correctly and safely.
The 2025 Hyundai Ioniq 5 is making waves as one of the most anticipated electric…
Switching to an electric vehicle (EV) isn’t just about reducing emissions—it’s also about embracing a…
As automotive innovation becomes a continuous changing world, one finds that this revolution is ever-evolving…
In the realm of hypercars, the Bugatti Bolide 2025 is a marvel that pushes the…
The start of the New Year has brought significant changes in the energy market, with…
An important component that is essential for starting a vehicle is the crankshaft position sensor…